Coilover suspension, as one of the most iconic chassis upgrade projects in the automotive modification field, is highly sought after by performance car enthusiasts due to its adjustable ride height, precise handling improvement, and personalized appearance. However, coilover suspension is not just a simple tool for “lowering the vehicle.” It is a sophisticated suspension dynamics system. From daily street driving to track racing, understanding how to scientifically select, properly install, and precisely tune coilover suspension is an essential core skill that every automotive enthusiast must master.
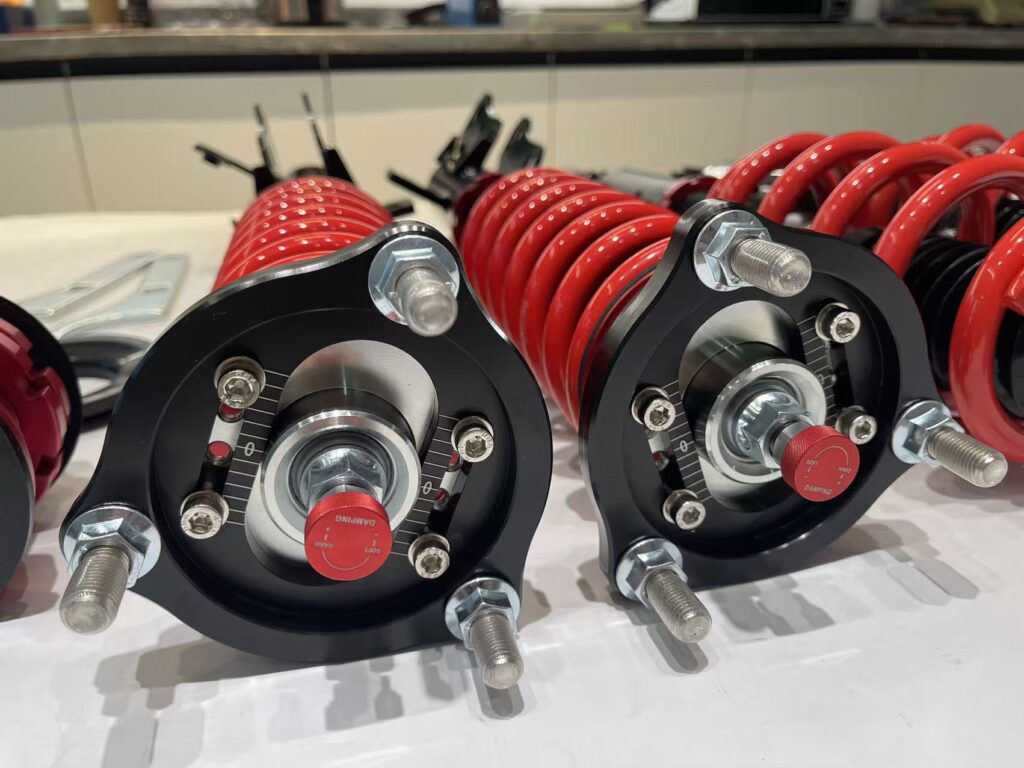
The core characteristic of coilover suspension lies in its “adjustability.” A standard set of coilovers typically includes the following adjustment functions:
Ride Height Adjustment – By rotating the spring perch threads, the mounting height can be changed.
Damping Force Adjustment – Usually provides 16 to 32 clicks of damping valve adjustment.
Spring Preload Adjustment – Some high-end models support independent preload adjustment. However, modern designs often decouple ride height from preload to avoid affecting the spring’s working curve.
Additionally, some products also feature adjustable camber plates, which are used to correct suspension geometry deviations that occur after lowering the vehicle.
The primary principle of street modification is “balance.” Many beginners mistakenly adjust their coilover suspension to the lowest possible ride height and crank the damping to the stiffest setting, believing this to be the most “aggressive” setup. In fact, this is a serious misconception. Street conditions are complex, with speed bumps, manhole covers, and damaged road surfaces everywhere. An excessively low ride height severely reduces suspension travel. Even minor bumps can cause bottoming out, which not only ruins ride comfort but also accelerates wear on the internal valve shims and seals of the shock absorber. A reasonable street ride height should preserve at least 60% of the suspension’s compression travel. Generally, lowering the vehicle by 20–40mm compared to the factory height is considered a safe range. In terms of damping adjustment, comfort should take priority over handling for street environments, with handling being a secondary consideration. It is recommended to set the damping at a low-to-mid level (for example, 4-6 clicks out of 16) to ensure a smooth ride for daily commuting, while still providing moderate support during quick lane changes or highway cruising. Spring rate selection is equally crucial. For street use, it is advisable to choose a spring rate 20%-40% stiffer than the factory setup. An excessively high K value will amplify high-frequency road vibrations, leading to reduced tire grip.
When advancing to track or canyon driving scenarios, the tuning logic needs to be completely transformed. On the track, the priority is maximizing tire contact with the road and precise body attitude control. The ride height can be lowered further, close to the chassis limit, but adjustable upper control arms or eccentric bolts must be used to correct the camber angle, ensuring maximum tire contact patch during cornering. Damping settings need to be adjusted toward stiffer and faster responses. Low-speed rebound damping should be increased to quickly suppress body roll during cornering and prevent excessive weight transfer that could lead to understeer (push). Low-speed compression damping needs to be finely matched to the braking force to avoid excessive front-end dive under heavy braking, which would compromise front tire grip. Some track-grade coilovers offer independent high-speed damping adjustment, which is used to handle curb impacts and bumpy surfaces, preventing the wheels from losing contact with the ground (becoming airborne).
Installation and alignment are critical yet often overlooked details that can make or break the setup. The top mount bolts of the coilover suspension must be tightened crosswise using a torque wrench according to the manufacturer’s specifications. The bushings must not be twisted or preloaded under tension. After installation, a four-wheel alignment is mandatory. For street alignment, the typical parameters are as follows:
Toe: Front wheels set to 0 to 0.1 degrees of toe-out (or slight toe-in for straight-line stability), rear wheels set to 0.1 to 0.2 degrees of toe-in to enhance high-speed stability.
Camber: For street use, front camber is typically set between -1.0 and -1.5 degrees. For track use, it can be increased to between -2.5 and -3.5 degrees.
Incorrect alignment can lead to uneven tire wear, steering wheel pull/drift, and abnormal handling characteristics.
Maintenance is equally important. The threaded areas of the coilover suspension need to be regularly coated with special grease to prevent rust and seizing. Never forcefully turn the damping adjustment valves while the vehicle is lifted off the ground or under load, as this can damage the internal valve mechanism. After every 10,000 to 20,000 kilometers of driving, or following each track day, you should inspect for oil seal leakage, abnormal noises from the top mount bearings, and spring fatigue or deformation. A high-quality coilover suspension typically has a service life of 5 to 8 years, but harsh operating conditions can significantly shorten it.
In summary, coilover suspension modification is a technical craft. Let go of the misconception that “stiffer and lower is always better.” Respect the principles of vehicle engineering. Tailor the ride height, damping, and spring parameters to your actual usage scenario, and pair them with precise four-wheel alignment. Only then can you truly unlock the full potential of your chassis. Whether you’re navigating through city streets and alleys or charging down a professional racetrack, a properly tuned set of coilovers will deliver a truly transformative driving experience.